
Important Note:
FileHound Save to Microsoft Outlook Add-In is only available to FileHound Cloud Subscription users.
How to install Add-in Through Office365 Integrated Apps
With many Outlook Add-ins, The FileHound Outlook Add-In can be installed through the Integrated Apps Feature that is enabled within the Office365 Admin Centre and is available to all Office365 Tenant users. This option enables the Administrator of the Tenant to deploy applications to users without needing to manually install onto each workstation.
The Application is deployed to the Mailbox of the users meaning that the user will see the outlook add-in within the Outlook Application as well as the Outlook Web Application.
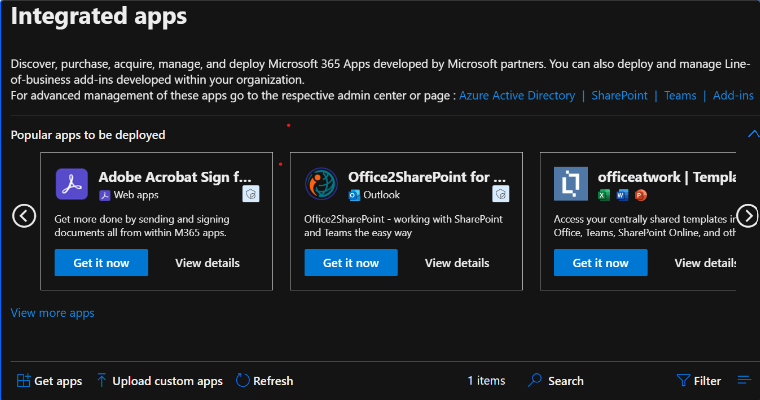
To install, Log into the Admin Centre of Office365. From the Admin menu, Click on Settings followed by integrated Apps. The window should display all Apps that are currently deployed as well as some Microsoft recommended choices.
Towards the bottom of the page, there will be a "Upload Custom Apps" option. Please click this to start the Integration process.
From here, select "Provide link to Manifest file" and enter the below URL:
https://outlook.filehound.cloud/manifest.xml
Once entered, click validate. This should take a few seconds and come back with a successful validated message.

Click Next and the wizard will now ask you to specify who would like the receive the add-in and there will be a few options here to choose from.
If this does not work, the Manifest needs to be downloaded and then uploaded to the Integrated apps option instead.
When deploying this to users, we would always recommend that IT or a select few users are picked first to test that the application comes across without any issues and runs successfully in the environment before deploying to all users. Once the groups or users are selected, click next and the application will show you the permissions and capabilities that the add-in will be able to do.
As this is a outlook only application, only the outlook application will be used and displayed in the permissions menu. The Application has certain permissions that need to be applied in order for FileHound to see the e-mail and it’s contents for indexing and attachment retrieval as well as the ability to take the documents or E-mail Contents and upload them into FileHound.

Clicking next to the permissions request menu will give you the overview of the application itself and the users/groups that you are deploying to.
Click Finish deployment and this will start the process of loading onto the tenant to then drop into the add-ins section of the user's outlook Web client or desktop application. This can take a few hours to deploy and will require the users to restart the web client or desktop application.
Amending Deployment groups after initial Deployment
Once the testing phase has been completed or you wish to add more users to the deployment, navigate back to the integrated apps menu within the Office365 admin under the settings submenu.
Within here, near the bottom of the screen will be the FileHound Add-in Package that has been deployed. Click the more options (3 dots) next to the application and select edit users. this will display the Users section where you can add additional users or remove users if required. Updating this will push the deployment out to the additional users.
Loading Application Manually via Outlook
If you do not have IT who can install this for you or would prefer to load this on manually, you also have the opportunity to deploy the Outlook add-in manually. This can be installed via the add-in menu via the Client or Web app.
Client
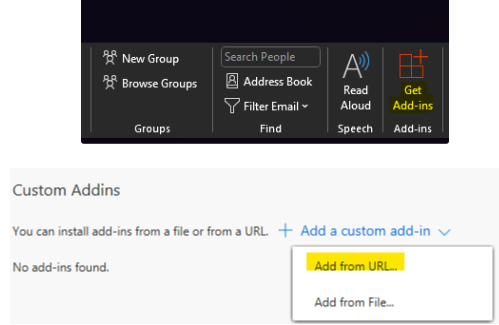
Within the outlook client, click on the get add-ins button located in your Ribbon along the top of the screen.
This is indicated by 3 Red Squares and a plus symbol.
When this is pressed, select my Add-ins on the left hand side followed by custom Add-in at the bottom part of the menu. Select the URL option and enter the URL mentioned above in the previous section (. This will load the Add-in onto the client.
Web App
Before starting, the Add-in Button may be hidden by default. To gain access to this, Please select the settings cog in the top right of the menu and select view all settings. Ensure that E-mail is selected on the left side and select Customise Actions from the submenu. Scroll down to the Message Subsurface menu and select the Get Add-Ins Option. Save this and you should see the options when going through the next section.

From the main outlook screen, Select an e-mail and the get add-in options should be visible on the right hand side next to the reply buttons. Select this and the add-in window should appear. Scroll down to Custom add-in, select URL and use the URL that has been pasted at the top of this Section (https://outlook.filehound.cloud/manifest.xml). This should add this in to use immediately.
Using the Add-in
To use the Add-in, select the e-mail you would like to upload or has the attachments within the e-mail and click the FileHound button along the top of the screen. If using the Classic Ribbon, this will display along the top of the screen. If using the Simplified Ribbon, there will be a more options tab (3 dots) and FileHound will be in this menu.
Classic Ribbon View

The Classic Ribbon FileHound option appears on the far right of the Ribbon. The option will only appears and become clickable once an e-mail is selected.
Simplified Ribbon View

The Simplified Ribbon view features the Save to FileHound option on the far right of the Ribbon. As with the Classic Ribbon, the option will only appear and become clickable once an e-mail is selected.
Web App View
To use the Add-in via the Outlook Web Application, open the e-mail containing the information you would like to upload, whether this is the e-mail contents, attachments or both. Within the E-mail, where the shortcuts for replying on the right, there will be a FileHound Icon. Clicking on this option will open the FileHound Outlook Add-in.

First Boot of Add-in

When loading the FileHound add-in for the first time, FileHound will ask for your credentials so the instance can link up to the correct tenant. Please type in your FileHound Username and Password and log in.
Once Logged in, you will see the attachments that are within the e-mail that was selected as well as the option to upload the e-mail itself if required.
For Web App users, this would appear on the right hand side in a column view. Click on the options you would like on the left hand side of the add-in, select the Team or user you would like to upload this to and click send to FileHound. This will then appear within the specified location.
Application Add-in View

Web App View


Was this article helpful?
That’s Great!
Thank you for your feedback
Sorry! We couldn't be helpful
Thank you for your feedback
Feedback sent
We appreciate your effort and will try to fix the article